
I’ve been getting many messages and e-mails requesting a breakdown of the scene I posted bellow.
So I’ve put together a quick breakdown of the materials and assets used in the scene and the WIPs, hope you enjoy it and I hope I helped! And again big props to Tor for his amazing DVD.
Modularity
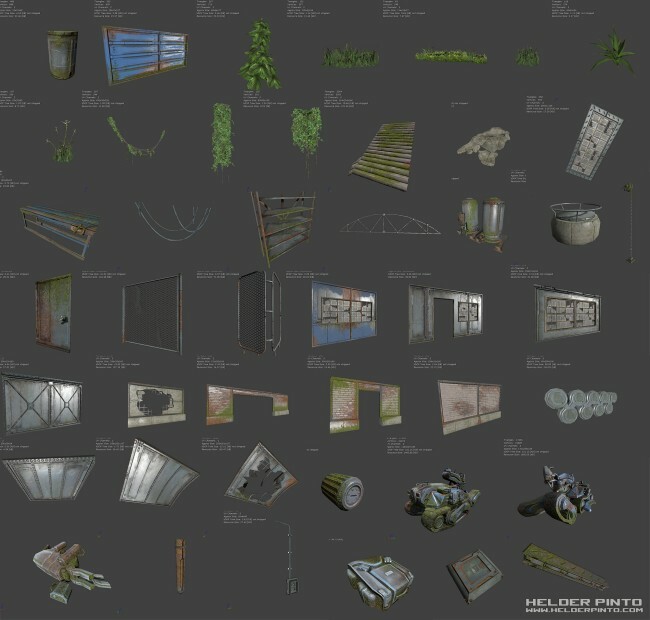
Everything that qualifies as “architecture” is modular and snaps to the grid to make it easier and faster to work with. All the walls, ceilings, windows, pillars, beams, pipes all snap to each other in the same grid coordinates. Everything else like the vegetation, smaller props, cables, etc I just turned off the grid and placed them where I felt they looked good.
Materials and textures
Apart from learning the engine, re-usage and smart modular environment art were my main goals with this scene, so just like Tor explains in his UDK DVD, I’ve created a Master Material for the entire scene and have a few instances of this material for different purposes, this materials allow Vertex Blend painting withing the editor, so each instance of an asset could be painted individually from one another, to achieve a different and unique look, this process is great to achieve some very different visual results with virtually no extra impact on performance.
For instance, the Tank/Robot in the scene is using an instance of same Master material as everything else, I just swapped the textures. So, all the Rust, Moss, Paint and dirt was painted with the in-editor Vertex Paint tool, each one in the R,G,B,A channels respectively.
Only two master materials have been created, one for pretty much everything being used in the scene and another one for the vegetation.
As for textures, again, I wanted to make as much reusing as possible, the whole environment uses a 2048*512 trim sheet where I mapped the vast majority of the assets with, one tillable 512*512 for the floor, the Tank is using a 1024*1024 and two 512*512 for the vegetation. I also needed to create the very small tilable 256*256 detail textures for the moss, rust and concrete cracks.
All the normal maps were made using nDo2, as for the metal areas I decided not to model high poly and I used the techniques showed on this video, and I also used ddo for the metal grime and noise. These both apps are amazing, and I couldn’t recommend them more!
Post processing
Oh this was a fun one, I needed to study how to achieve good post-processing in UDK so I opened Epic Games Jordan Walker’s BatheHouse scene and studied how he managed to get that amazing high end look. And ended up adding vignette, a gradient to make the scene brighter in the bottom and darker on the top of the image, and a slight chromatic abberation. Also switched to a filmic tonemapper and tweaked it heavily to get the pastel and washed out shadowed areas.
I also made dirty lens and bokeh effect, I used the bottom texture to achieve the effect and I’ve placed the camera dust / scratches in the Alpha.

Also, I’ve been getting some questions on how to do good post-processing.
Well, photography is one of my hobbies, and I got very used to image manipulation in a program called Lightroom from adobe.
So what I did was, I took a screenshot of the scene, worked it a little bit on lightroom until it looked just like I wanted it, then I went back into the editor and tried to mimic what I did in lightroom with the in-editor post processing tools, and I found this process surprisingly easier than I thought and it really worked, because you know exactly what kind of result you’re going for because you’re tweaking the parameters with a goal in mind, instead of just tweaking ’till it looks good.
That’s about it, on to the next project!
Thanks for reading!