Lighting a Night Time scene - Video Series

General / 31 March 2021

These video series turned out to be a bit longer than I initially intended, but it does cover a lot of ground on my lighting process. It's a 4 part (3.5 hours total) series on lighting a night time scene in Valve's proprietary Source 2 engine, from scratch.

Lighting is one of the most important aspects of game art, it makes or breaks the presentation of a level, it has an impact on performance and gameplay, since a good lighting pass may be used to enhance player navigation among other important things like telling a narrative through art.

Starting with a pre made scene as a daytime lit environment set in the city of Porto, we'll be covering different kinds of light setups, different kinds of lights and fog settings, materials, effects, prefabs, 3D Skybox, HDR Skybox texture and material, bakes, post processing and the philosophy behind lighting game environments.

If you want to experiment with Source 2 engine, you'll need to grab yourself a copy of Half Life Alyx, and download the workshop tools, that said however, I don't necessarily believe the techniques shown here are unique to this engine, quite the contrary they are interchangeable with any other engine you might work with, be it a inhouse or Unreal Engine as many tools tend to be very similar, I touch on a lot of "philosophy" behind lighting in game levels as I work on it, so come on and follow along... :)


Enjoy, and thank you for watching.

Report

Porto - Portugal (Source 2) Breakdown Part 2 / 2

Making Of / 28 March 2021

(Missed part 1? Check it out here)


Ultimately decided that with some careful material blend, texture tweaks and set dressing, I could get this freaking round wall and the small alley next to it to look natural.
Also, started to do some set dressing here and there.


Here's how the wall and the small sloped alley looks from the other side. I ended up making a brand new texture uniquely for ground here, it tiles only in one axis so I could get the sides to gradient just like the way I wanted it.


Started to give some of the smaller back alleys some love and modeled a unique building to the far end of the alley, as I found that copying and pasting the same buildings over and over was becoming a little repetitive, so I took the time to make a unique building there and make it very different by not using plaster on it, and instead it being fully made out of stone.


At this stage, some of the sidewalks and roads were feeling a little flat. Fortunately, hammer comes with a built in sculpting took, just one hotkey away, so I tessellated the terrain and gave it a few brush strokes around the whole map.


Here's the final result of the ground, just wobbly enough to get that organic and old cobblestone look to it.


Good time as any to take a step back and reevaluate the main shot of the scene and tweaking a few composition elements, moving a few props and tweaking the lighting. Notice how I try to jump from one thing to the other constantly, your whole map is your canvas, so avoiding spending too much time on a corner of the map or some detail that no one will ever see is usually not wise.


And with that, I realized that the blue sky was looking a little empty. I really wanted to have a saturated beautiful blue sky but it was lacking something. This scene being set in Porto, this is the perfect opportunity to feature the famous "Luís I Bridge", so I quickly blocked that out and made a 3D Skybox level, that Hammer requires to make backdrops with.


So as the main area of the scene is nearing what I'd consider finished quality, I still have the back rear alley and corners of the map to give some attention and love to, and I still have the doors and windows to finalize. I left that until the end, as I knew it was technically a small detail.


Total, there's about 3 different buildings that I copied around, and just applied a different plaster material to them. This, while wise to do to cut on time it also lends itself to repetition, so I made sure that all of the corners of the map have a uniquely modeled building, hiding the repetition and giving me a good opportunity to add some unique detail to the map and have some fun with set dressing.
Also tried to use big rocks to hide some intersections, I tried this before and didn't exactly work but if done with care it could work. I could also place some weeds around the rocks later so it blends even better.


And here's the opposite corner, also featuring a unique building, and a modular kit of stairs, to break up the corner a little bit too. Since these buildings are unique, I made sure the vertex blend really pops a little bit more than the others, and the shapes are a little bit more angular and irregular, use all the changes you got to break up repetition and make things look unique.

I also finally ended up making a new parallax material and texture for all of the windows.


Then I made sure everything looked good around the map, checked for floating geometry, texture seams, lighting bugs, added a few ambient sounds, etc.
Also made a unique 3D skybox with some far away buildings to complement the bridge, added a new HDR sky texture to the skybox too, finished the bridge, made my own post process and color correction, finalized and pushed the lighting a bit by manually placing some point lights to enhance the color bounce from the walls, also placed quite a few "fog pointlights" around to give the gameplay areas a thicker feeling, did a set dressing pass around the whole thing and a "story" pass too, by naming the restaurant, the streets, and created a few flags using the cloth sym system build it in the editor, the flags are from the local sports club (F.C. Porto) and obviously the Portuguese flag, try and find them. :)
Also made a newspaper prop with a real life texture from the front page of a local sports newspaper, hopefully the locals will appreciate the little detail.
Among other (not so) small details, like making a street plaque and naming all the streets with usual Portuguese names, all icing on the pudding that makes all the difference in the end.
 
And bellow, a short flythrough video and the final screenshot.
Click here to open my portfolio and see the final scene in HD.


 Thank you for reading, reach out if you have any questions I would like to know if content like this is of any help at all.

-HP


Report

Porto - Portugal (Source 2) Breakdown Part 1 / 2

Making Of / 28 March 2021

When Half Life Alyx was released back in early 2020 it made me realize that there's still so much we can still do with this media. If you're fortunate enough to have tried VR, specially a fully realized experience such HL Alyx, you know it's definitely ground breaking. Now, whether or not VR will reach mass adoption or stay niche is still up to the debate, but no one can deny it's a paradigm change when it comes to immersion.

Coincidentally, we were all under lockdown, and I was pretty bummed I couldn't go back home to see my family, so I decided to try and bring home to us, and this post is a breakdown of the process I used on this environment.

I've always wanted to tackle a VR environment as a developer / artist every since it started to become popular, but never really had the chance or the drive to do it. HL:A made it easier for me, as it's development tools are available to the public, including all of the game's assets for anyone to reverse engineer and study (one of my favorite ways to learn) and I was just hooked...

I love how Source 2's Hammer comes with a really powerful modeling toolkit, usually with any other modern engine, you need to author all your geometry on a 3rd party modeling application, but in here that's completely optional as you can do most of the work in the editor, should you choose to.


I started out by blocking out a small area, trying to get a feel for the modeling toolkit and trying my very best to stick to the grid, and this engine makes that very easy, in fact it almost forces you to go out of your way (holding control) to move geometry off grid, this really shows that this editor was made for modularity and smart modeling workflows.


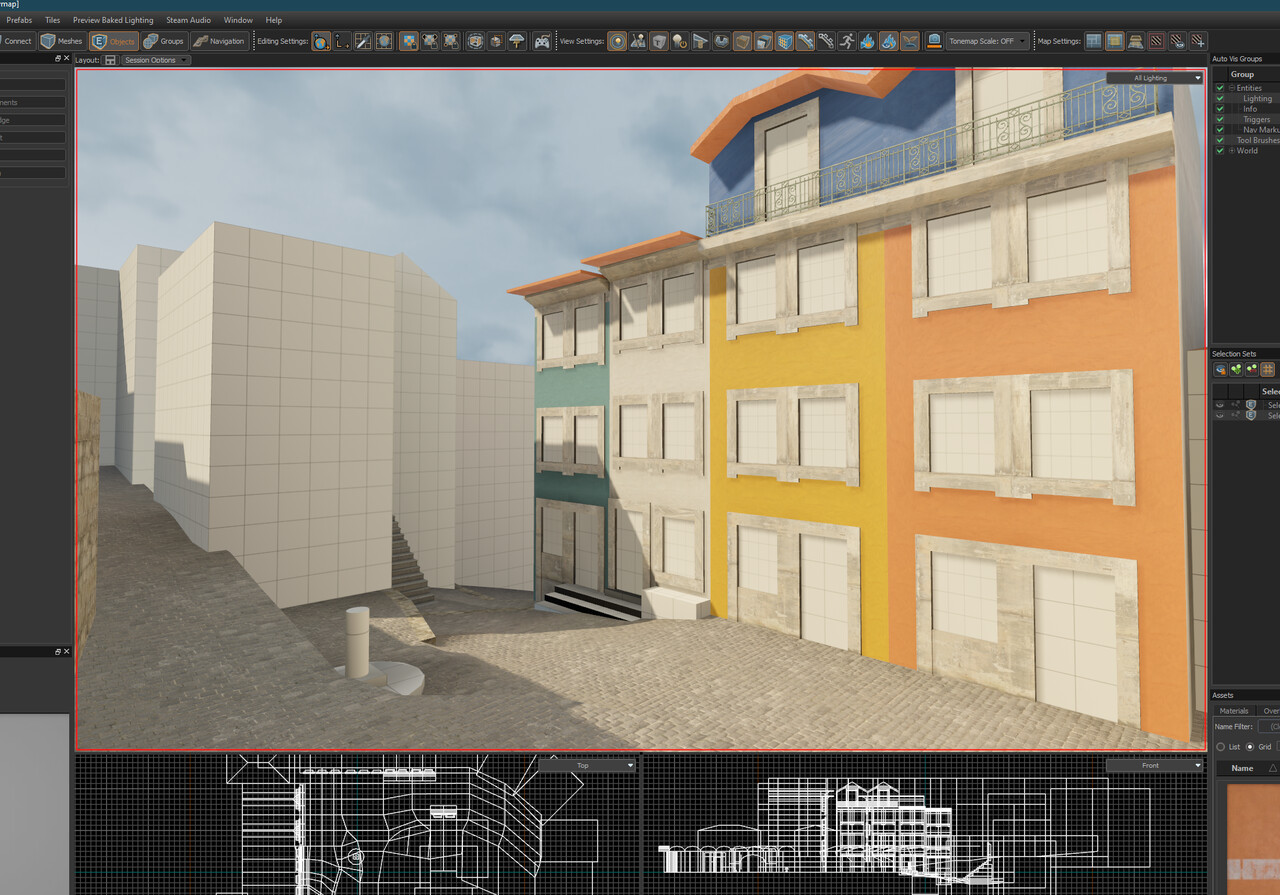
When I was happy with the dimensions of the buildings, I started throwing some solid colors on there. You could argue it's too early for that, but I wanted to start pre visualizing the colors as soon as possible here, and it helps me staying exited for the progress being done and it actually helps getting a sense for scale.


Also made a modular window and door prefab and started to dress the facades of the buildings. This is good to start detailing in a non destructive way.


In this phase, I made another window and door prefab to be used only on the bottom section of the buildings. Also went on www.textures.com and picked some nice scans that I thought represented the look of the usual cobble stones you see on these alleys of Porto.
This was a good opportunity to try out the new Hammer's material editor, this engine doesn't let you make custom shaders like Unity or UE4, which sounds restrictive but I actually like to be limited. Creativity breathes in restrictions, besides you probably have here in your disposal pretty much all you need to make an environment in terms of shaders, simple, blend, parallax, decals, etc.


Started to try out a few materials, and to see if blending two different rock materials would look acceptable here, for more variety I vertex painted bigger rocks towards the edges and smaller ones in the middle of the road.


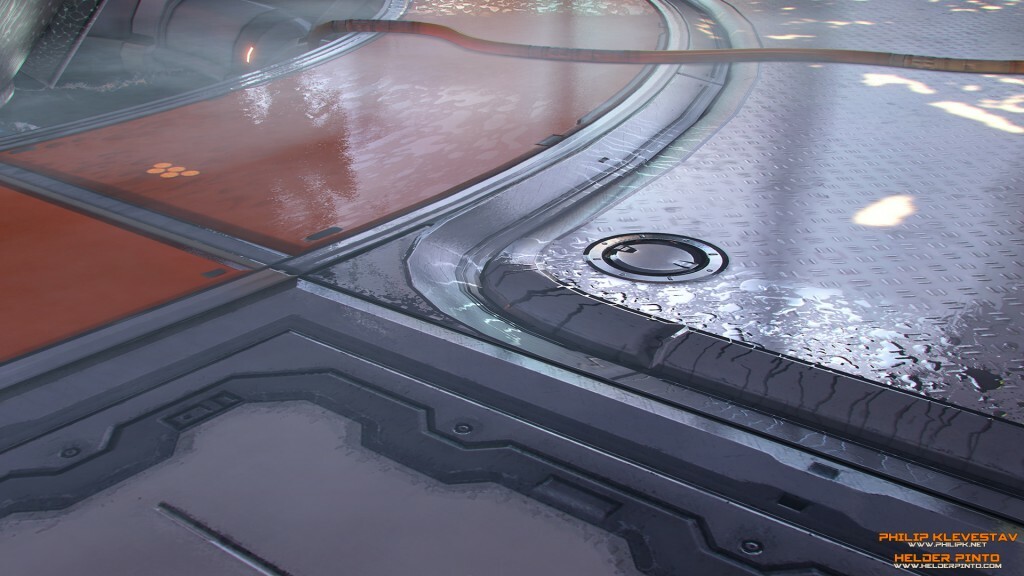
Started doing some early lighting work here too, put in some slight fog, tweaked the sun strength and color, added reflection probes and I did some experimentation with how I was going to achieve the curbs and organic walls here. I realize it's better to not model these, and instead use modular assets to set dress these corner edges.


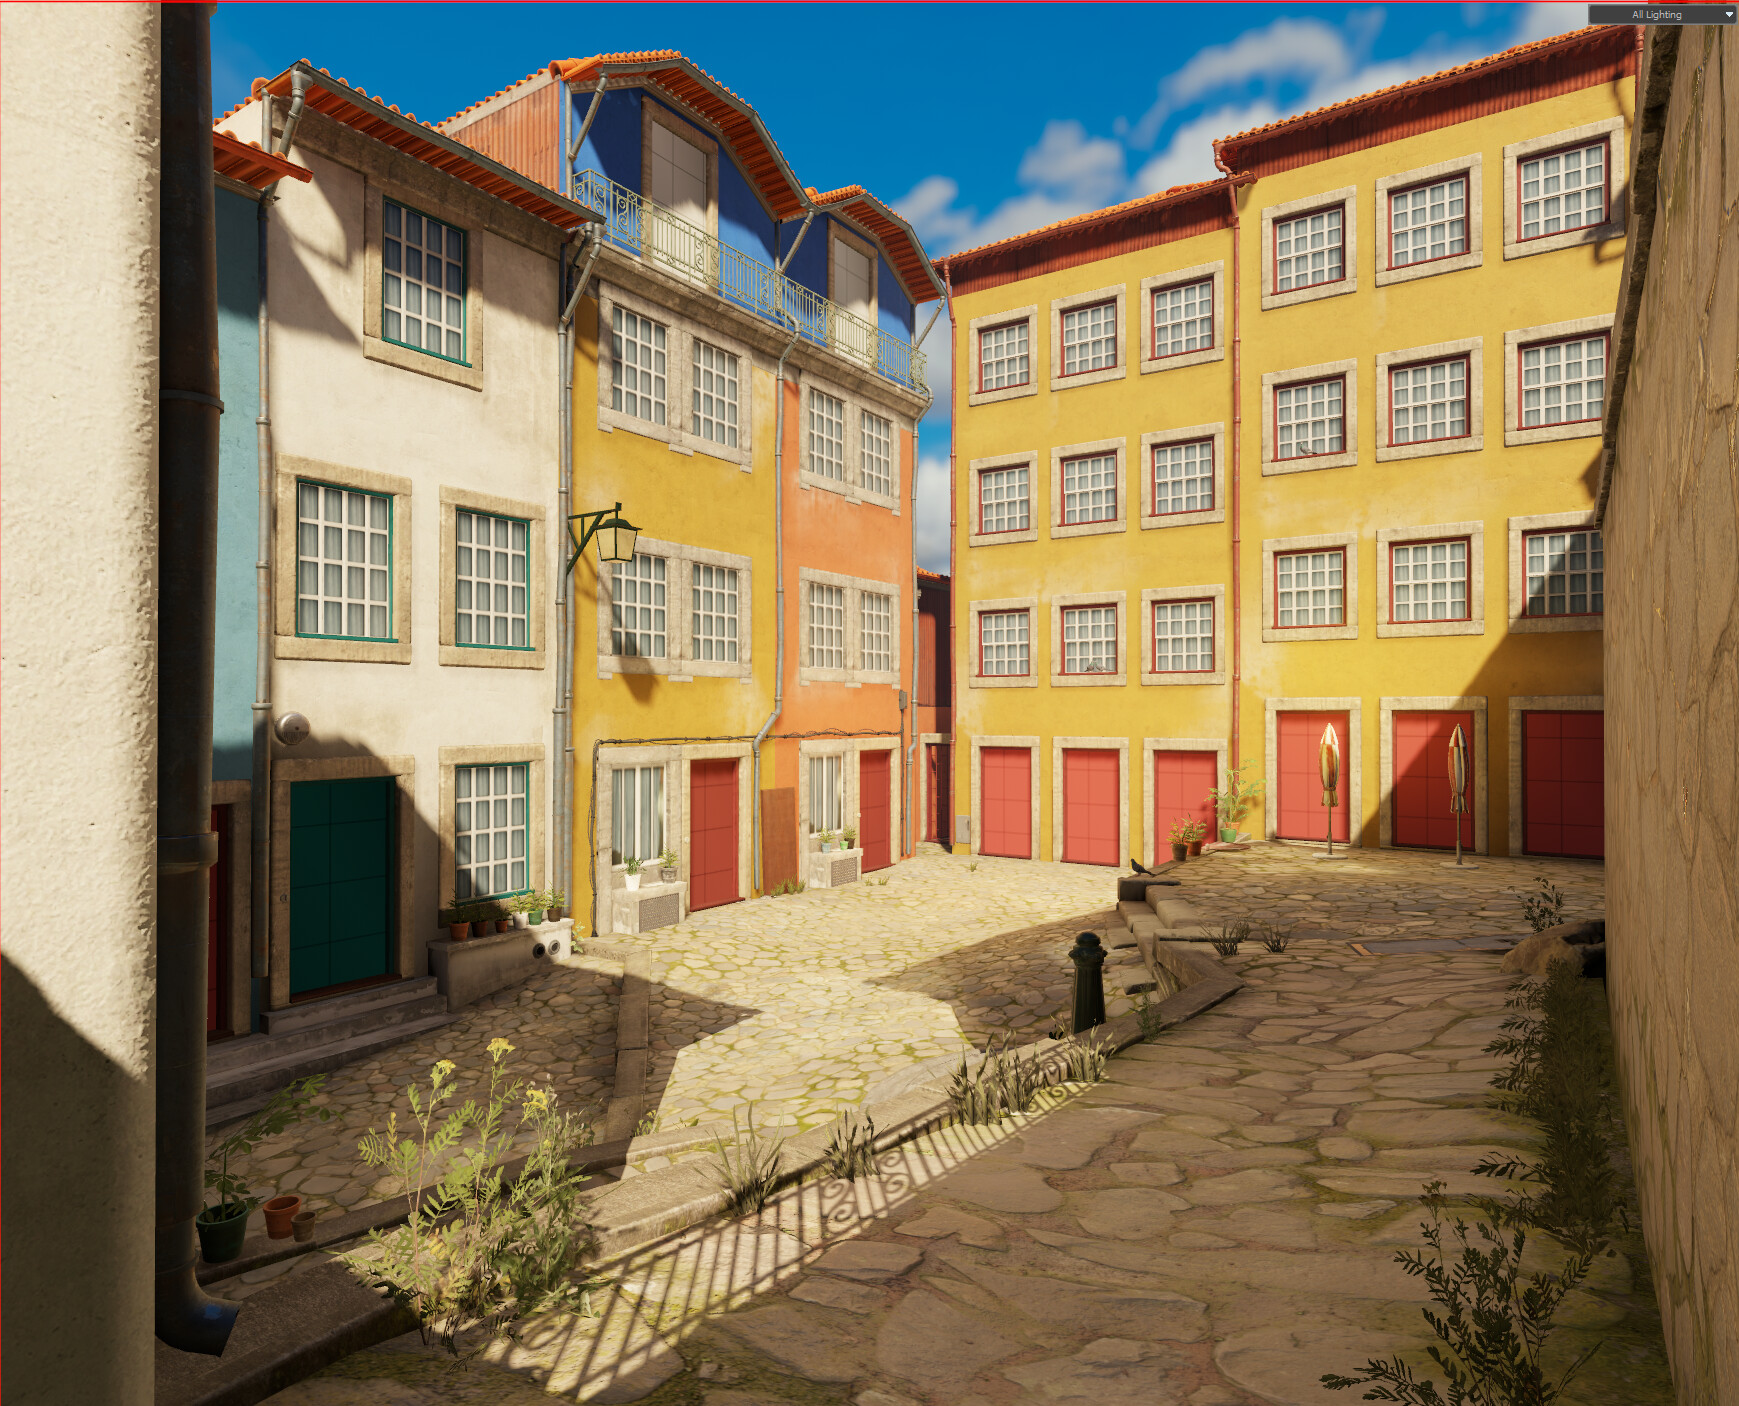
Some further refinement on the building shapes, and threw some railings in there to help get a sense of scale.


Added a few new materials and refined the shapes of the building even further. Also started to narrow down the color pallet a little bit too and was learning the UV / mapping toolkit. All the geometry being on the grid helped a lot, but there's still quite a few organic shapes on here, specifically on the ground that were going to prove a little bit more challenging, slopes are never easy to do, specially when there's buildings involved.


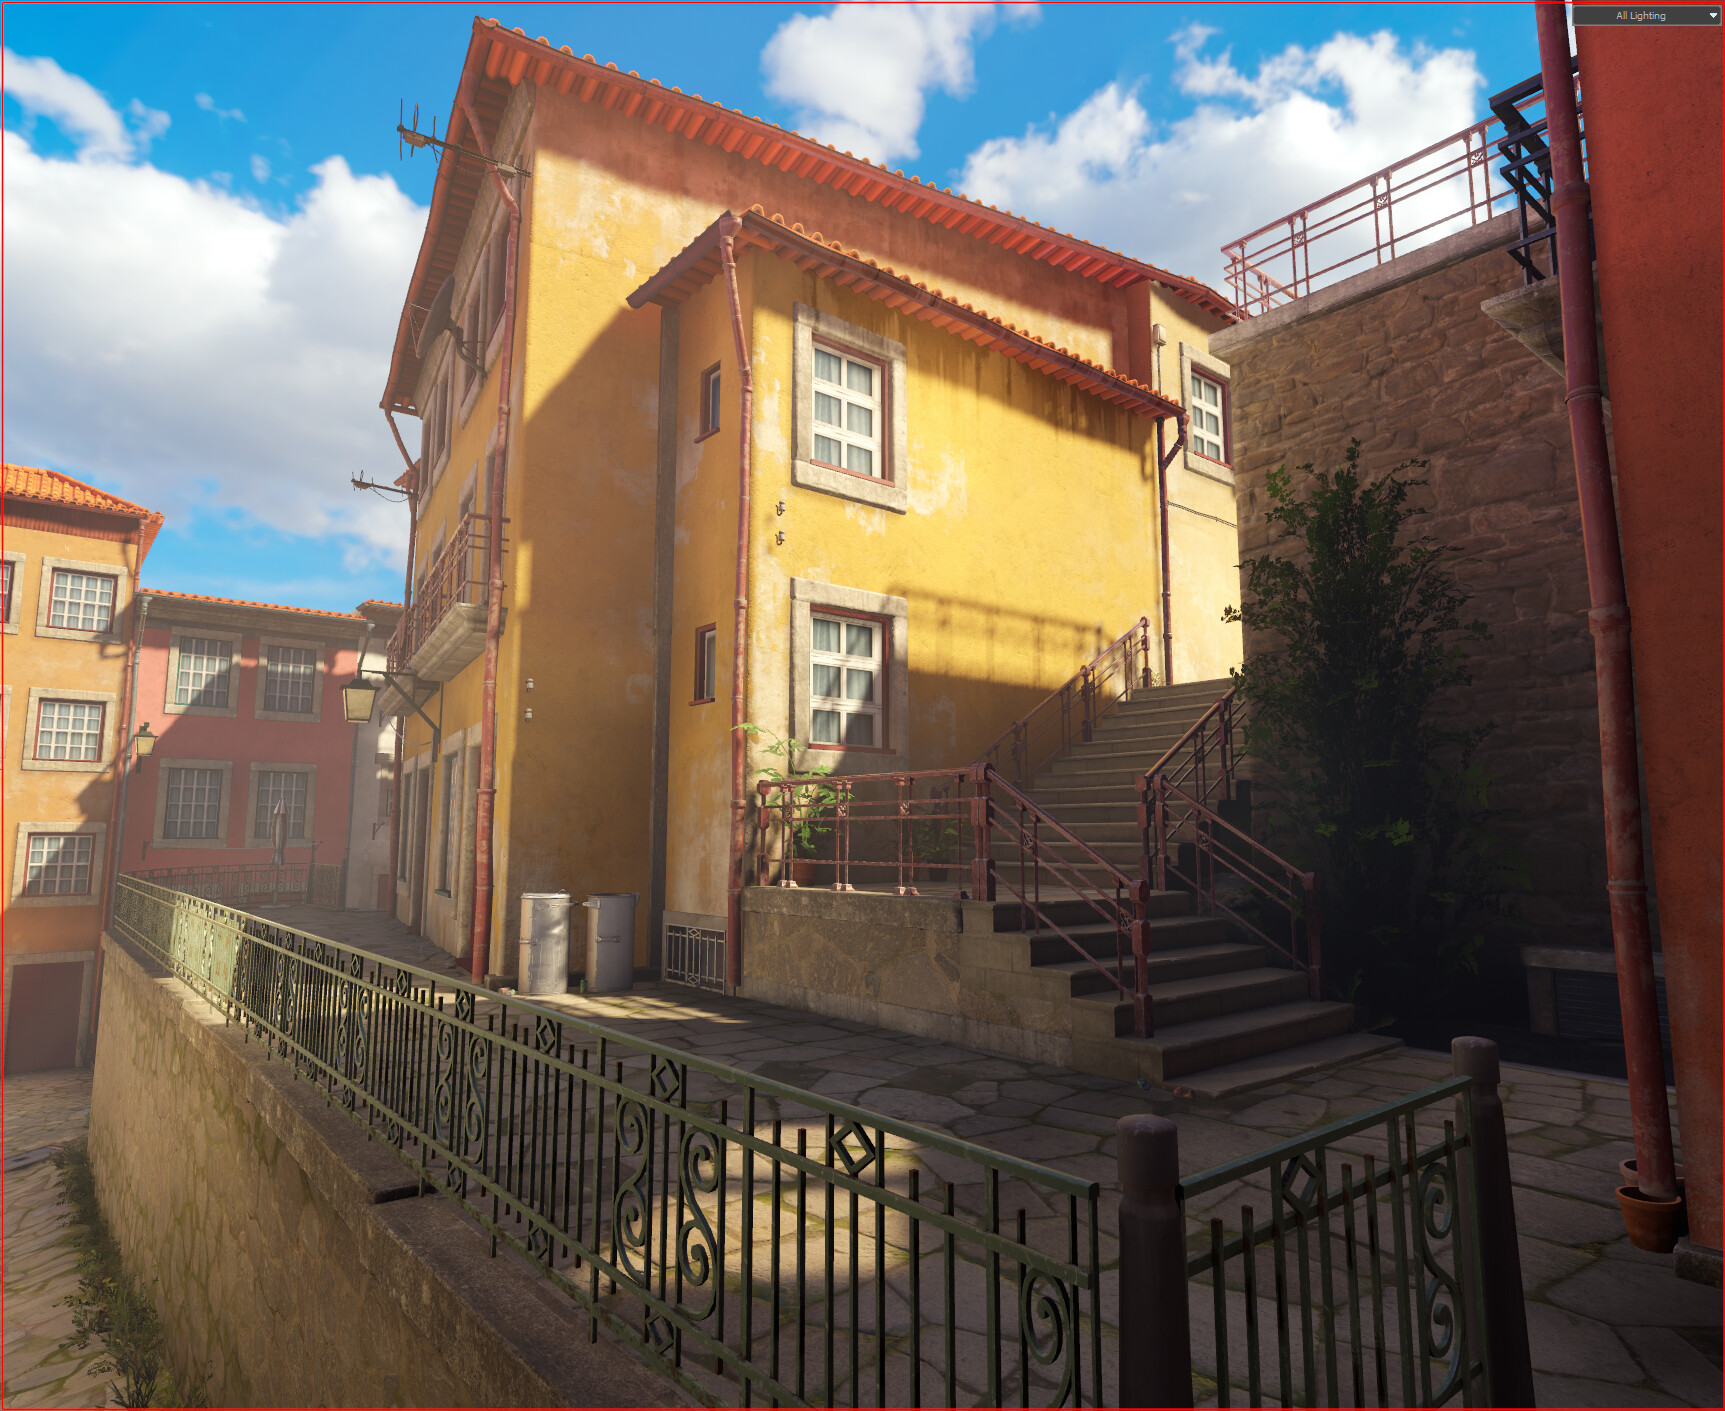
I made sure the map was contained and always playable. Added light importance volumes, did a few test bakes and dropped all the necessary entities to play this in VR. This is started to get exciting, walking around your own environment was a really amazing feeling I've never felt in my near 2 decades of making games.  


Portugal being a southern country, the sun gets pretty strong specially during the summer months, I really wanted to reinforce this feeling by adding some sun reflections from the big glass windows. Unfortunately it doesn't seem it's possible to add masks to spotlights like other engines I've worked on, but it is possible to change the shape of the spotlights via a library of a few different shapes, square with smooth edges was all I needed so this was enough.


I searched the HL:A stock materials for a few props and materials to start replacing the flat colors and default grid textures. Even tho most of this stuff is temp, it gives me a good estimate for how much I have left to do and it helps fleshing out the look faster.


When I wanted to make the rooftops, was when I started to feel that Hammer's modeling toolkit wasn't enough. So I hopped on Maya and modeled a modular kit for the rooftops. Since all of the builds are on the grid, I know exactly how big the corners needed to be.


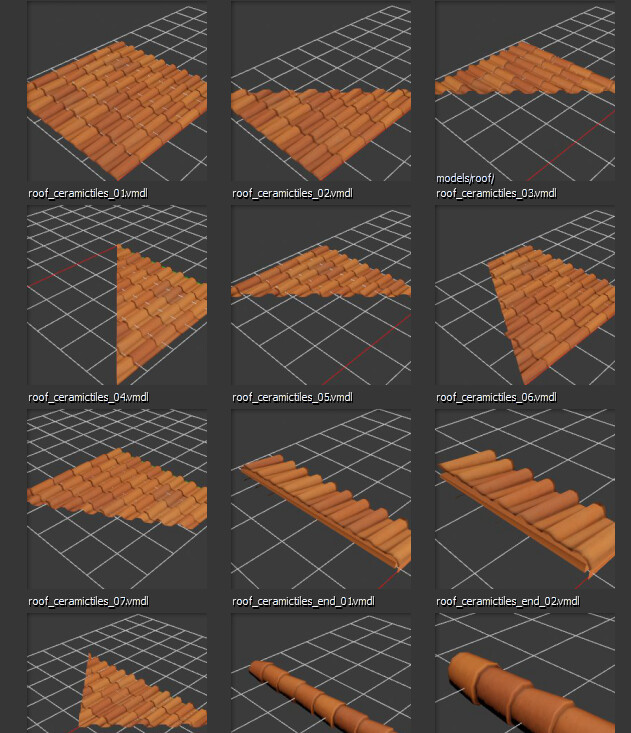
Some quick set dressing with the correct grid settings, and I could make all the rooftops fairly quickly.


At this stage, I couldn't help myself and started to put in some props, rain gutters, and some foliage too. Probably way too early, in hindsight I shouldn't have done it at this point yet but as long as you don't spend too much time in one specific thing when there's a bunch of other things requiring your attention like making the doors, windows, balconies and other bigger stuff, I'd say it's ok.


A few more prop placement too... I was just having too much fun in VR grabing and throwing stuff around. I knew there wouldn't be any enemies or any sort of gameplay in this scenes, so I tried to place plenty of stuff to look and interact with.  


Alright, those blockout windows now have been annoying me for way too long, it's time to tackle them. Initially I intended to model them in Maya and bring them in as a model, but I choose to instead stick with prefabs. All of the windows you see here are copies of the same prefab, so, I just spent a little bit of time beveling the corners and doing some proper mapping and they look alright with the obviously benefit that I only need to do it to one and it would propagate to all the other instances.

I also modeled a few props are that unique to this scene, like that typical Portuguese wall lamp.


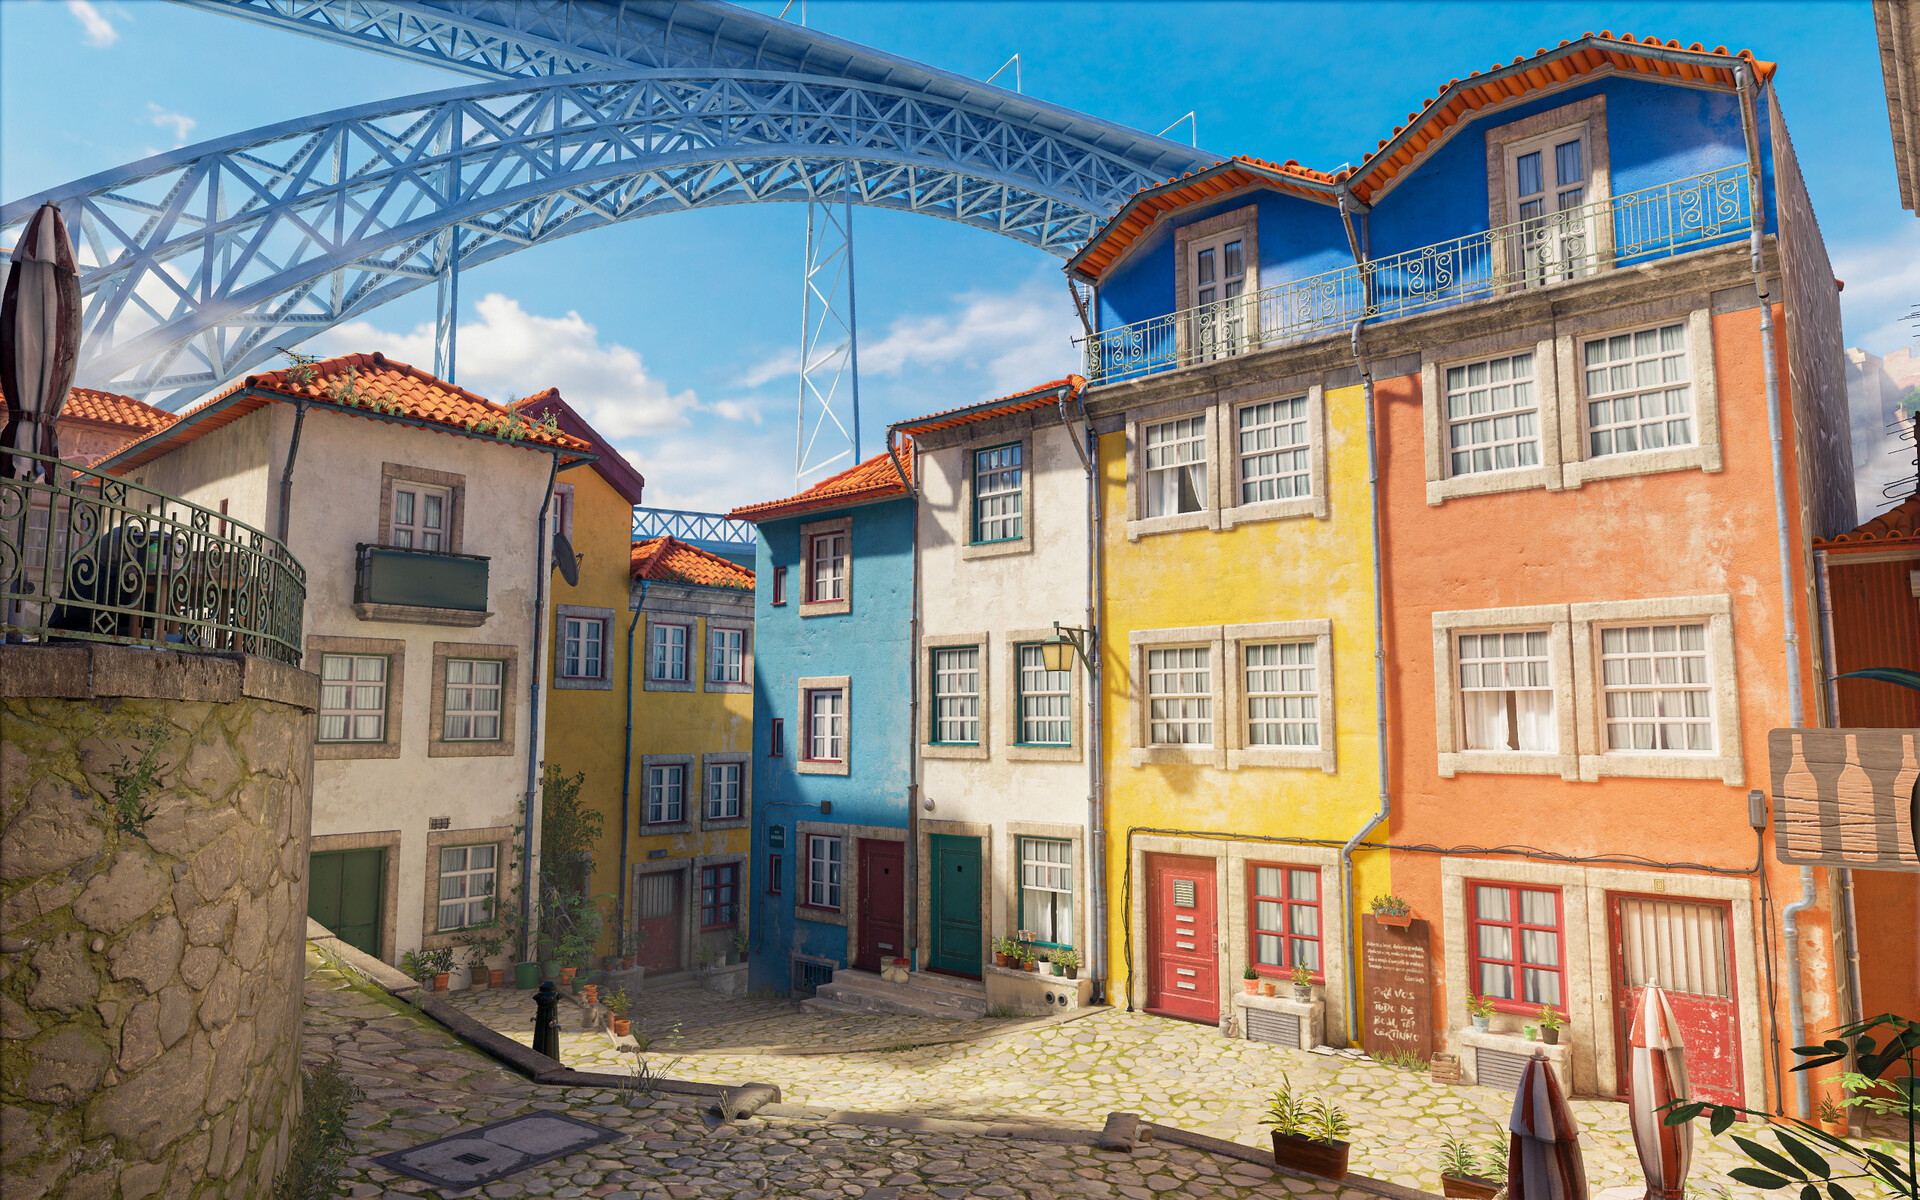
Once I was happy with the window stone frames, I dupped the prefabs and created different versions of them. These ones for example, have a inner red wooden frame.
Also, notice I started to make some colored plaster materials. In fact, this is just one material that blends with a second color which is white, and they both share the same mask. The color, is achieved through a model tint, allowing me to control the color of each building individually through a slider in the editor itself, no need to jump between photoshop and the editor exporting color maps.


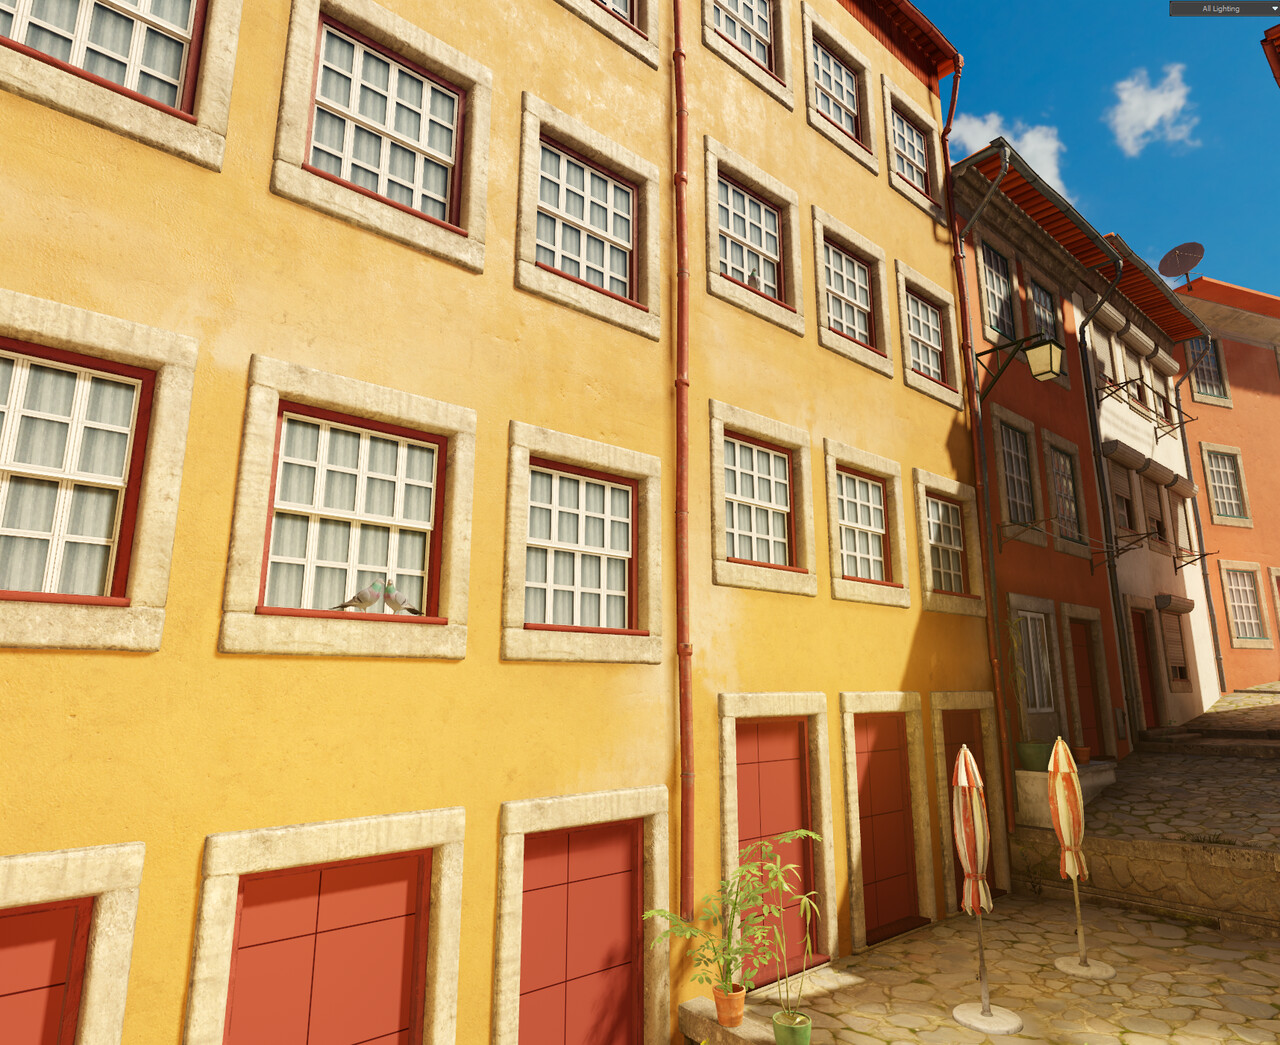
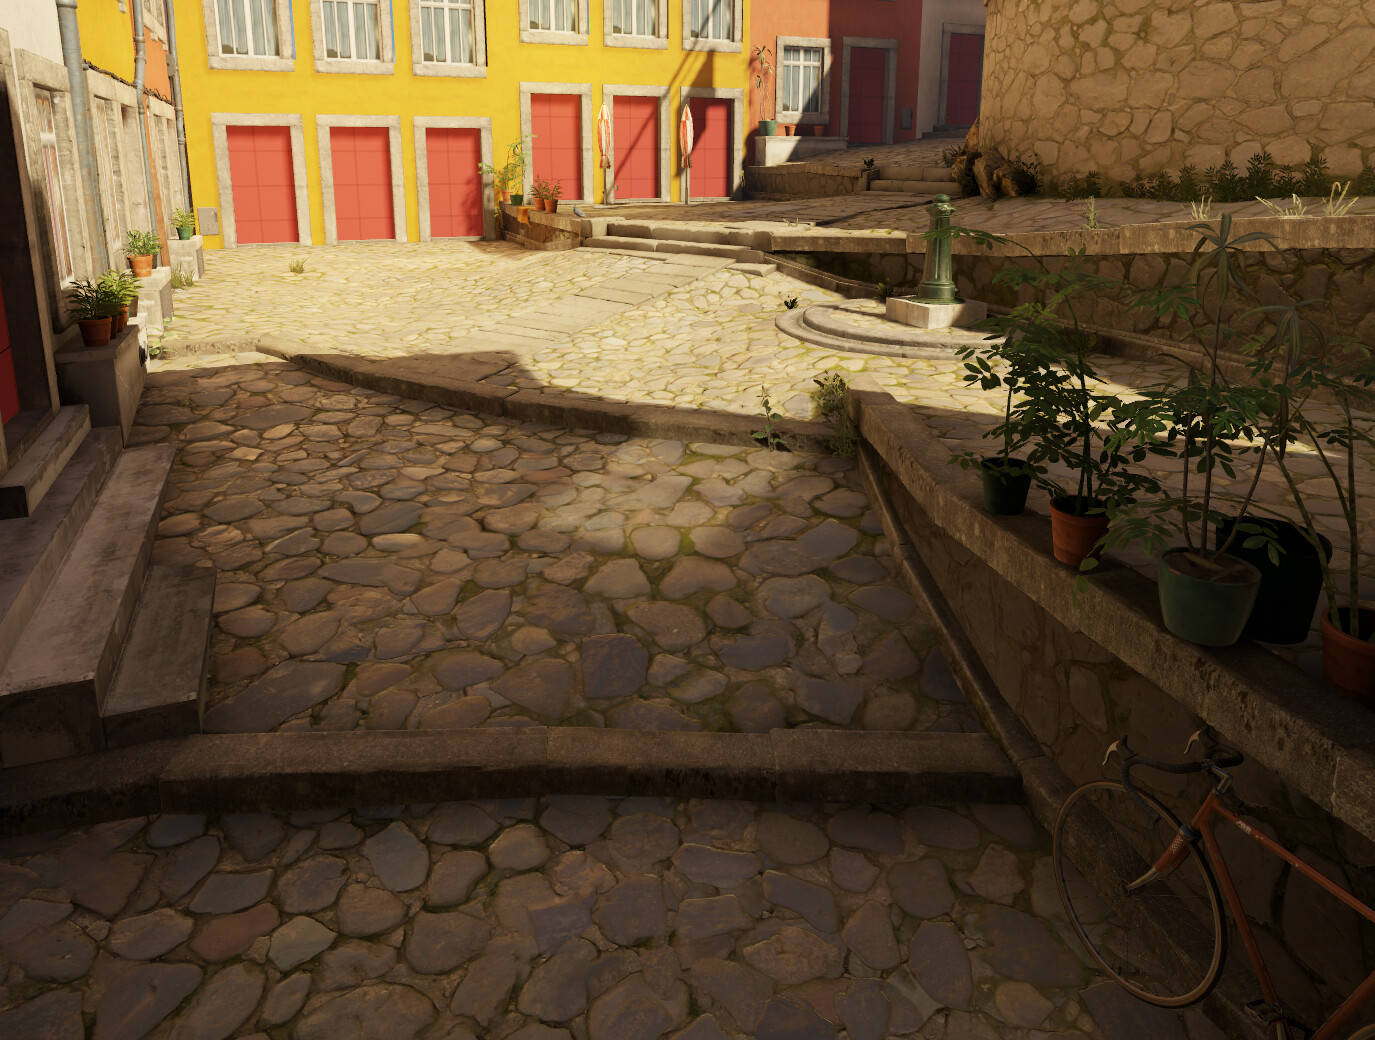
The back alley of the scene also required some love, the round stone corner was still something I didn't exactly know how was going to do successfully. So what I did here was to try and hide the top edge with a modular curb kit, then blend two different stone textures together, and paint the darker texture on the top and bottom of the wall to create a gradient. To hide the transition between the ground and the wall itself, I painted some moss to the bottom of the textures and hand set dressed a few weeds along the walls ground edge.


Another angle of the rear back alley and the round wall, still struggling with a few intersections so I played around with the blending here to introduce some gradients and reduce repetition.


  (To be continued in Part 2)


Report

Talk on Modular Environment Art for Video Games

Making Of / 14 August 2020

I often get contacted by artists starting their careers in making art for video games, they often ask about tips and tricks on how to optimize your workflow.

I'm unfortunately not the greatest public speaker but back in 2016, I gave a talk at Gnomon in Hollywood California on how to smartly build a game environment by respecting a handful of pillar workflow techniques, the foundational principles still apply today, in fact now more than ever, so I'm reposting it here for posterity.

Feel free to e-mail or message me about any specific question you might have, I'm always willing to help.

Thanks so much,
HP


Report

Post apoc scene Breakdown

General / 02 January 2020

I’ve been getting many messages and e-mails requesting a breakdown of the scene I posted bellow.
So I’ve put together a quick breakdown of the materials and assets used in the scene and the WIPs, hope you enjoy it and I hope I helped! And again big props to Tor for his amazing DVD. 


Modularity

Everything that qualifies as “architecture” is modular and snaps to the grid to make it easier and faster to work with. All the walls, ceilings, windows, pillars, beams, pipes all snap to each other in the same grid coordinates. Everything else like the vegetation, smaller props, cables, etc I just turned off the grid and placed them where I felt they looked good.


Materials and textures


Apart from learning the engine, re-usage and smart modular environment art were my main goals with this scene,  so just like Tor explains in his UDK DVD, I’ve created a Master Material for the entire scene and have a few instances of this material for different purposes, this materials allow Vertex Blend painting withing the editor, so each instance of an asset could be painted individually from one another, to achieve a different and unique look, this process is great to achieve some very different visual results with virtually no extra impact on performance.
For instance, the Tank/Robot in the scene is using an instance of same Master material as everything else, I just swapped the textures. So, all the Rust, Moss, Paint and dirt was painted with the in-editor Vertex Paint tool, each one in the R,G,B,A channels respectively.
Only two master materials have been created, one for pretty much everything being used in the scene and another one for the vegetation.

As for textures, again, I wanted to make as much reusing as possible, the whole environment uses a 2048*512 trim sheet where I mapped the vast majority of the assets with, one tillable 512*512 for the floor, the Tank is using a 1024*1024 and two 512*512 for the vegetation. I also needed to create the very small tilable 256*256 detail textures for the moss, rust and concrete cracks.

All the normal maps were made using nDo2, as for the metal areas I decided not to model high poly and I used the techniques showed on this video, and I also used ddo for the metal grime and noise. These both apps are amazing, and I couldn’t recommend them more!


Post processing

Oh this was a fun one, I needed to study how to achieve good post-processing in UDK so I opened Epic Games Jordan Walker’s BatheHouse scene and studied how he managed to get that amazing high end look. And ended up adding vignette, a gradient to make the scene brighter in the bottom and darker on the top of the image, and a slight chromatic abberation. Also switched to a filmic tonemapper and tweaked it heavily to get the pastel and washed out shadowed areas.
I also made dirty lens and bokeh effect, I used the bottom texture to achieve the effect and I’ve placed the camera dust / scratches in the Alpha.


Also, I’ve been getting some questions on how to do good post-processing.
Well, photography is one of my hobbies, and I got very used to image manipulation in a program called Lightroom from adobe.
So what I did was, I took a screenshot of the scene, worked it a little bit on lightroom until it looked just like I wanted it, then I went back into the editor and tried to mimic what I did in lightroom with the in-editor post processing tools, and I found this process surprisingly easier than I thought and it really worked, because you know exactly what kind of result you’re going for because you’re tweaking the parameters with a goal in mind, instead of just tweaking ’till it looks good.

That’s about it, on to the next project!

Thanks for reading!

Report

UDK – Arbor Vitae [breakdown and download]

General / 28 November 2013


This scene was a 8 week collab with the extraordinary talented artist and friend PhilipK.

The idea is here is that Humans have colonized this planetoid called Askalaphos, and are in the process of creating an atmosphere similar to planet earth by using an atmosphere processing station. The air outside is not 100% breathable yet, but it already allows for the growth of vegetation, specially in the vicinity of the station, and the stations around it, hence the use of H2O as the main element of the scene, the whole point of this facility is to create a breathable and living atmosphere which couldn’t not be possible without… Water! No water, no life anywhere!

The scene is set inside one of the outer rooms of the station, more specifically inside one of the big control rooms, featuring a gigantic window with a beautiful view to the outside world, which from that angle you’ll be able to see the other end of the complex, the other towers, natural terrain and the sky. We wanted to make use of bold colors and staying away from the same old desaturated look you typically see in sci-fi, we were also set on staying away from gritty/scary as much as possible and instead try and make the space seem like it’s livable and looking almost inviting. This whole facility is built around the idea of creating life!

DOWNLOAD

We’re releasing this UDK package and map so people can learn from it, don’t use it for any commercial purposes.
IMPORTANT: We recommend using DirectX11 render mode to properly view this scene. Go to “File – Switch Renderer – DirextX11”

Have fun and check our WIP threads if you want to know more about the making of the scene:
Mapcore WIP thread: http://www.mapcore.org/topic/16660-arbor-vitae-udk-scene-wip/
Polycount WIP thread: http://www.polycount.com/forum/showthread.php?t=127659&highlight=arbor+vitae


Here’s the concept I made to start this scene with, it’s what we used to get us jump started on the visual language we would be going for, taking very strong inspiration from Doom 3 and Halo 4.


Some WIP pictures taken from our forum threads:


And here is finalized scene:


Report